Making Home-made Chocolates
The process is actually similar to roasting coffee beans, however with gentler requirements. You need to roast them for 5-35 minutes at temperatures between 120-160 degrees C. What you should do first is expose the beans to a high temperature, and then lower the temperature eventually. Then, stop roasting when you have observed that the beans are starting to crack
After roasting them, crack using a hammer and get rid of the husks by hand if you work with a small batch. And for larger batch you may utilize a very coarse, Corona type mill when cracking the beans into nibs. Stir the nibs in a gentle manner using your hands or a spoon to winnow the nibs while you blow on them using a hair dryer up to the point where the husks are blown away.
You will be needing something strong enough in order to liquefy the nibs and separate the remaining husks. General food processors and majority of the juicers won’t do. A lot of individuals making chocolate at home are successful with the Champion Juicer. Feed the nibs in a lenient manner into the juicer one handful at a time. Otherwise, the motor might overheat. Cocoa liqueur will be coming out of the screen, with the mixture of husks and liqueur through the spout. Feed mixture through the juicer only until husk is coming out of the spout.
Conch and refine could be done at the same time with the use of a powerful wet grinder. Conch and refining rely upon the equipment that is utilized.
Tempering is practically the hardest part of making a chocolate. It guarantees you that your chocolate comes out to be shiny with a snap to it instead of being matte and soft that would melt in your hand. You have to take care that no moisture enters your chocolate. If moisture enters your chocolate it will ruin it. For that you can buy a tempering machine online.
Lastly, you mold the chocolate while it is still liquid. Gently pour it into the molds, making sure it won’t get spilled. You can pour them using a big syringe in the mould. You have the freedom to freeze, refrigerate, or let them harden at room temperature. Remove them after they have hardened into the mold. They must have a glossy appearance and must snap cleanly.

Categories: chocolate articles Tags: Chocolates, coming, feed, Homemade Chocolates, making, roasting, Tempering
Chocolate Melting & Tempering Machine 1.58 Gal
Chocolate Melting & Tempering Machine 1.58 Gal
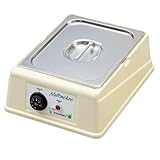
- 15.74 in. x 12.99 in.
- h 5.31 in. 110V. Capacity 1.58 Gal – Basin 12.59 in. x 1.04 in. h 3.93 in.
- Manual Thermostat to control the temperature desired.
- Removable Stainless Steel basin and lid.
- Thermoresistant plastic material.
Available capacity 0.92 Gal item # MC01110V, 2.37 Gal item # MC03110V, 3.61 Gal item # MC04110V
Melt 70% of your chocolate setting the Melting Machine at 40 – 45°C;
Wait until the chocolate will be melt completely while checking the thermometer. This operation is necessary to have the butter crystals melt;
Add the rest 30% of your chocolate to the mixture already melt. This procedure represents the insemination of cocoa butter present in the chocolate;
Mix strongly the chocolate in order to lower its temperature: The ideal temperature is different depending on the type of chocolate that we are working
Dark chocolate 32° – Milk chocolate 30° – White chocolate 29°. By lowering the temperature of the chocolate we have the stabilization of the cocoa butter crystals;
Once reached the right temperature, you need only to keep this temperature for the required time to work it.
Advantages of the well temperated chocolate:
The removal of the praline will be easier and it will look shinier because the sugars and the cocoa butter will not appear on the surface causing that unpleasant white coating;
The praline or the chocolate bar will have that crunchy effect when you break it or bite it;
The praline will not melt in your hands.
In case the surface of the chocolate in the basin should start hardening, because of the room temperature, just use the hair-dryer to melt it. Do not increase the temperature!!!
The same technique can be used if the temperature of the chocolate starts going down. In this way you catch up the temperature. If the temperature increased, act on the thermostat and lower 2 – 3 degrees, mixing the chocolate.
KEEP the chocolate always stirred to have the butter crystal stable.
DO NOT PUT pieces of chocolate left from molding into the tempering machine!!!!
Keep them for next time while starting the whole procedure from the beginning. The reason is due to the cocoa butter stabilization.

List Price: $ 1,120.00
Price:
Related Chocolate Making Products